
Labeling Audio assets
Beta AccessAudio is currently available as a beta modality. Contact [email protected] for activation or inquiry.
Kili now supports Audio as a new data modality, alongside Text, Image, Video, PDF, and Geospatial. The Audio interface is purpose-built for tasks like speaker diarization and transcription, where you need to segment an audio file over time, identify who is speaking in each segment, and transcribe what's said.
A typical Audio project lets your team:
- Split a recording into timed segments
- Tag each segment with a speaker
- Transcribe the content of each segment
- Review and export the result as structured, model-ready data
This guide walks through setting up an Audio project, importing audio, the Audio interface, and how to label an asset from start to finish.
Setting up your project's interface
The Audio interface supports two types of labeling jobs:
- Segment transcription — the core job of an Audio project: transcribing the content of each segment. This job is mandatory and included by default whenever you create a new Audio project — you don't need to add it yourself.
- Asset-level transcriptions and classifications — optional jobs applied to the asset as a whole rather than to individual segments, useful for things like tagging overall audio quality or language. You can add as many of these as you need when configuring your interface. [Note: subjobs (nested jobs) are not yet supported for these, but are coming soon.]
Importing your audio assets
You can bring audio into Kili the same way you would any other asset type:
- From the Kili app — drag and drop files directly into your project's dataset, or use the Add assets button. See Adding assets from your local workstation.
- From the SDK — use the Kili Python SDK to import audio assets programmatically, the same way you would import images, videos, or PDFs. See the Importing assets and metadata tutorial.
- Sync from a cloud storage bucket — as with other modalities, you can connect a cloud storage integration (AWS S3, Azure Blob Storage, GCP Cloud Storage) and sync audio files directly into your project. See Adding assets from cloud storage (integrations).
Supported audio formats: MP3, MP4, FLAC, and WAV.
The Kili Audio interface
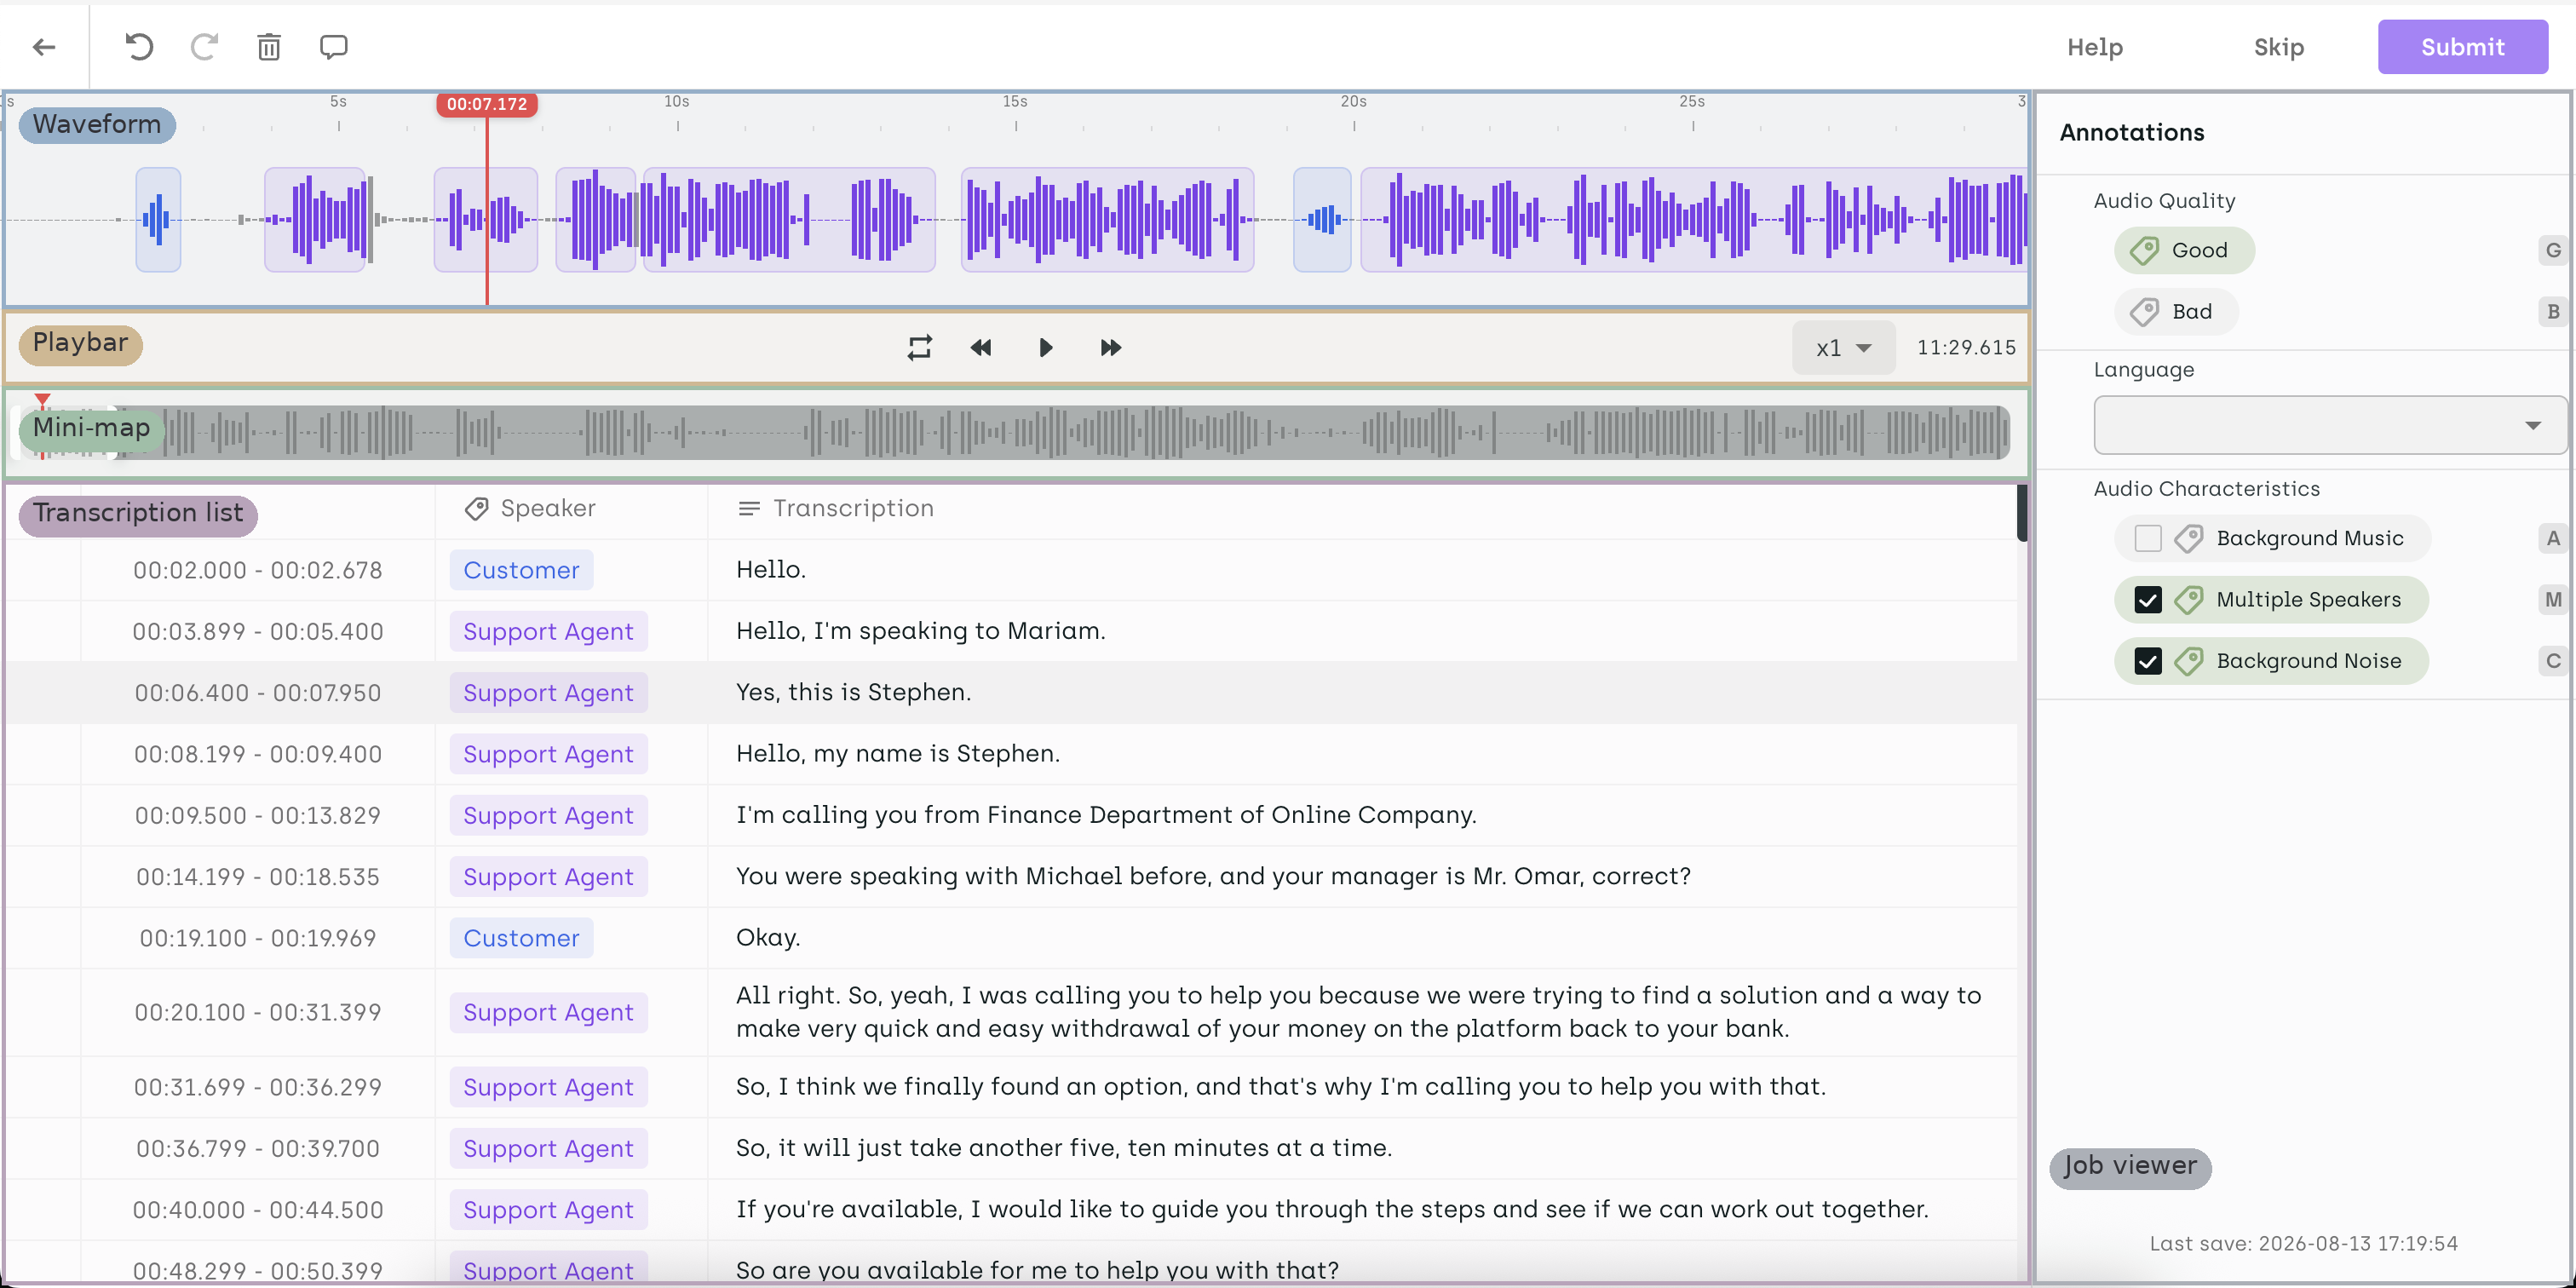
The Audio interface is built around five main components:
- Waveform — the visual representation of your audio track, where you create and edit segments
- Playbar — playback controls for the asset
- Mini-map — a zoomed-out view of the full asset, used to navigate long recordings
- Transcription list — the list of segments and their transcriptions, kept in sync with the waveform
- Job viewer — the panel where you fill in your asset-level jobs (e.g. audio quality, language), separate from the segment-level transcription work done on the waveform
Playback and navigation
Playing the audio
- Play / Pause — start or stop playback, either by clicking the play button or using the
Spaceshortcut.⌥ + Spacetoggles play/pause even while you're editing a transcription. - Skip forward / backward — move the playhead 1 second forward or backward with
⌥ + →and⌥ + ←.
Navigating the asset
- Drag the playhead — you can drag the playhead, or simply click anywhere on the waveform, to jump to that point in the recording.
- Selecting segments — move between segments with
←/→(or↑/↓), without touching the mouse. - Zooming the waveform — use your mouse wheel to zoom in and out, and
⇧ + 1to reset the zoom level. - Mini-map — for long recordings, use the mini-map to jump to a different part of the asset. You can drag it to move your view, or resize it to zoom in and out of the waveform.
For the full list of available shortcuts, open your shortcuts menu, available from the Help menu.
Labeling audio assets
Importing pre-labels
If you already have segments, speakers, or transcriptions (e.g. from a model pass), you can import them as pre-labels so your team starts from a draft rather than a blank asset. See Importing labels.
Creating and editing segments
Draw a segment directly on the waveform to mark the start and end of a unit you want to label (e.g. one utterance). Segments can be resized or moved after creation, and deleted with ⌫ once selected. [add: how to create — click-drag? tool selection?] Jump to the start or end of the current segment with ⌥ + ↑ / ⌥ + ↓. Toggle repeat mode with ⌥ + R to loop a segment while you listen closely.
Adding speakers
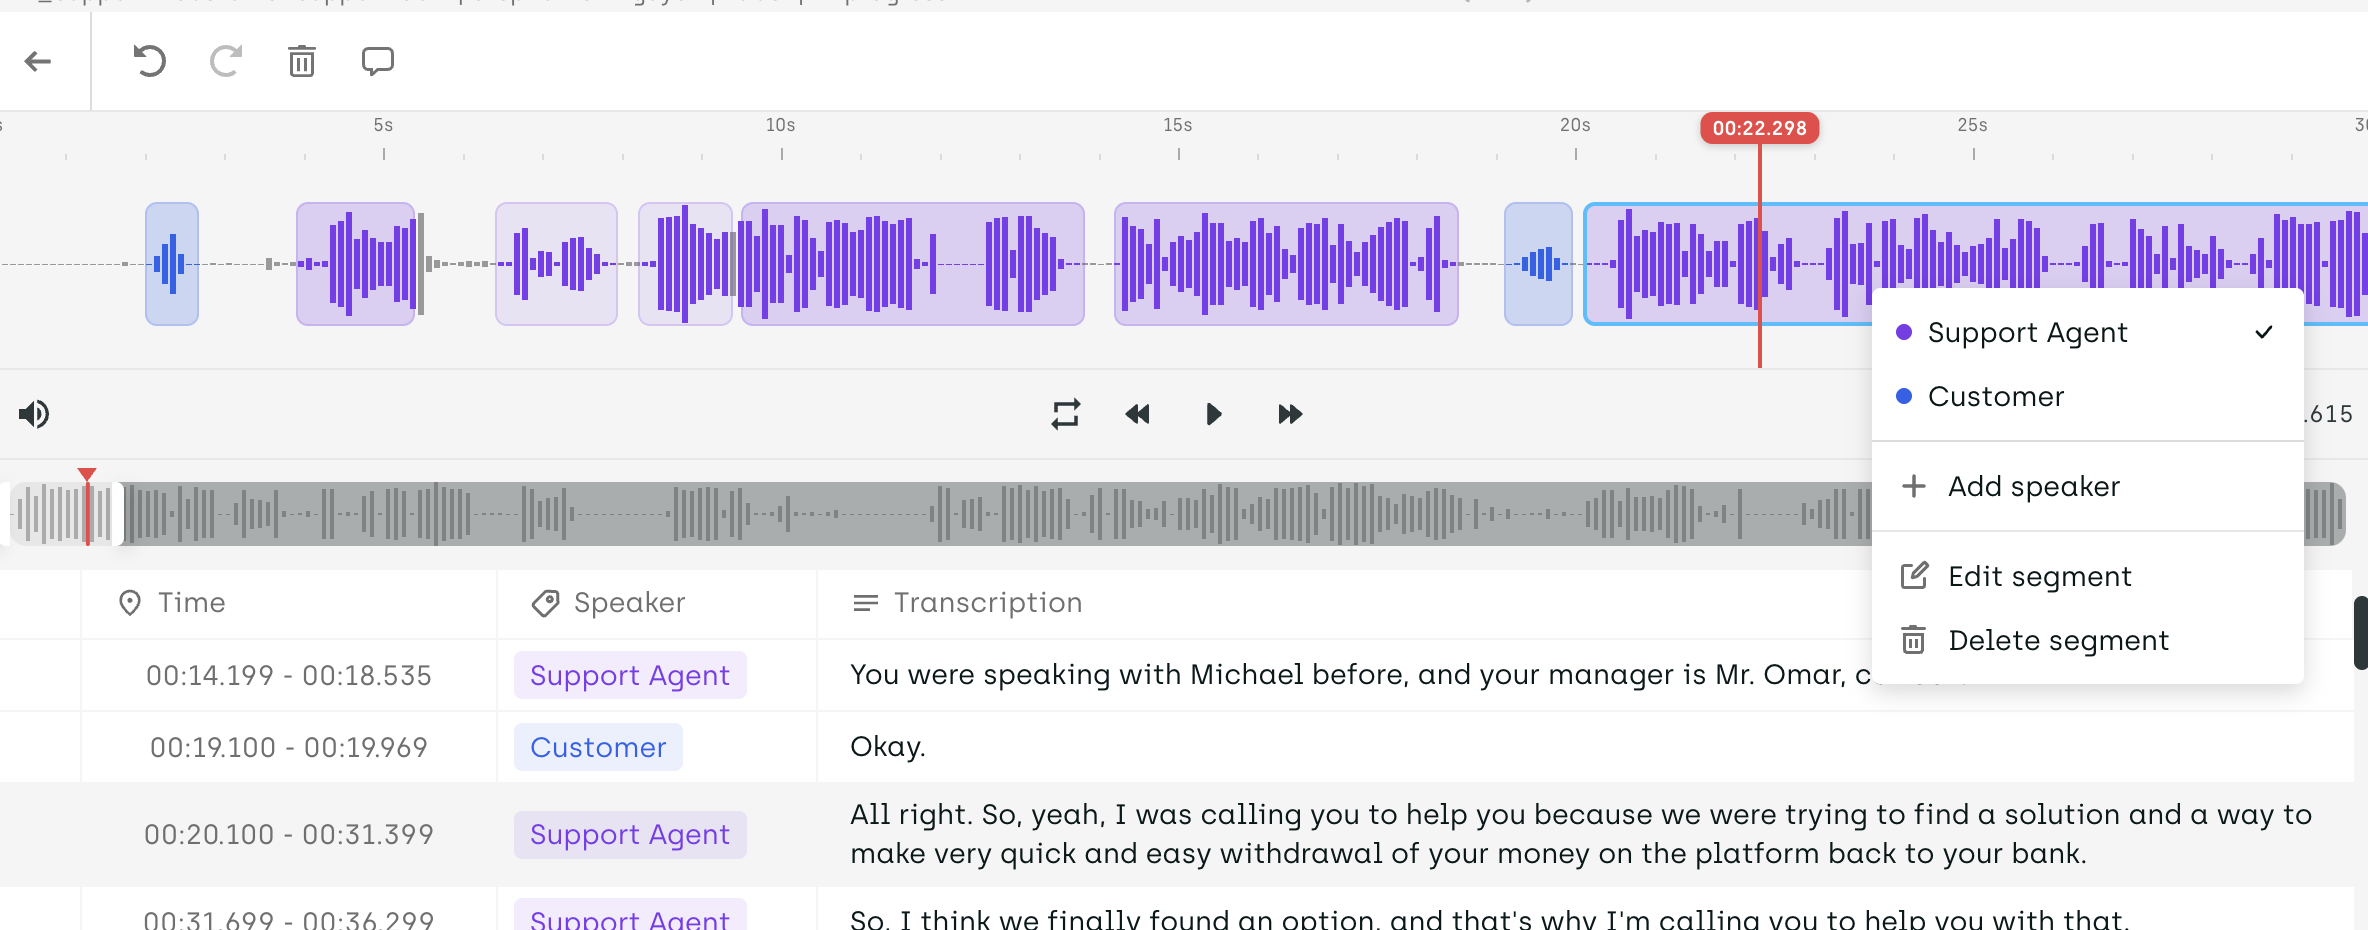
Assign a speaker to each segment to build out diarization. Right-click a segment to add or edit its speaker — from there, you can also rename the speaker and change its color.
Editing transcriptions
Add or edit the transcribed text for a segment directly from the transcription list, which stays synced with the corresponding segment on the waveform — double-click a row to start editing it. Press Enter to edit the selected transcription, and use Tab / ⇧ + Tab . o move to the next or previous segment without leaving the keyboard.
Exporting your labels
Once labeling is complete, export your audio labels the same way you export from any Kili project — segments, speakers, and transcriptions are included in the export payload. See Exporting project data and the Kili data format reference. [confirm export format specifics for audio — JSON structure example would help here]
Current limitations
Audio is a beta modality, and the following are not yet available:
- No quality metrics: honeypot, consensus, and review score are not currently supported on Audio projects
Updated 2 months ago