
Using semantic segmentation
The task of image semantic segmentation consists of detecting specific regions of objects within an image.
So in image semantic segmentation, our goal is not only to identify the presence of given objects, but also to identify their positions, dimensions, and shape. This requires work at pixel level in order to classify every single pixel of the object. This can be achieved in an approximate way by drawing the shape of the object.
In Kili app, semantic segmentation can be:
Standard semantic segmentation
To create a semantic segmentation annotation:
- Select a category.
- Hover over a specific point of an image, and then press and hold your left mouse button.
- While holding the left mouse button, draw the shape of the object.
- To complete the shape, move your pointer to the first point that you clicked on and release the left mouse button.
- After drawing an annotation, you can use the Add and Subtract tools in the toolbar to include or exclude parts of the shape.
- While editing, hold the Spacebar and drag your mouse to pan across the image, if needed
- Press
Enterto exit edit mode and save your changes
If you release the left mouse button while drawing, the line you're drawing will change to a dashed line.
You can now complete your shape by making a diagonal connection to the first point that you clicked on.
Example image showing how a shape is completed using a diagonal, dashed line:

Example image with completed semantic segmentation on one object:

To edit an existing semantic segmentation annotation:
- Click the annotation to select it.
- Press
Enterto switch to edit mode. - Use the Add or Subtract tools in the toolbar to reshape the annotation or modify the mask.
- While editing, hold the Spacebar and drag your mouse to pan across the image, if needed
- Press
Enteragain to exit edit mode and save your changes.
Interactive semantic segmentation with SAM 2
If the images are managed in a Cloud storage, Interactive segmentation will work only if the integration is set up with the Grant Kili authorization to process assets on its servers option activated.
To perform interactive semantic segmentation:
- Select a category.
- From the toolbar, select the interactive segmentation tool.
- You have the flexibility to create segmentation masks using two tailored models:
- Rapid: Get results quickly with a faster model, ideal for rapid processing.
- High-Res: For tasks requiring higher precision, this model delivers greater accuracy at a slower pace.
By default, the Rapid model is selected, but you can switch to the High-Res model if you require better accuracy.
- Click on the object that you want to classify. Object mask will be created automatically.
Interactive segmentation has been implemented with the SAM 2 model working in the background, which means that the generated masks will be of very high quality. Getting the first generated mask may take a few seconds, but any subsequent masks will take much shorter to compute. You can interrupt the interactive segmentation process by pressing the ESC key.
- Adjust the created mask:
- To add a specific region from the mask, click in the center of the region that you want to add to the mask. Region will be added automatically.
- To remove a specific region from the mask, press and hold Alt/Option and then click in the center of the region that you want to remove from the mask. Region will be removed automatically.
- To cancel and remove your mask, press the Escape key.
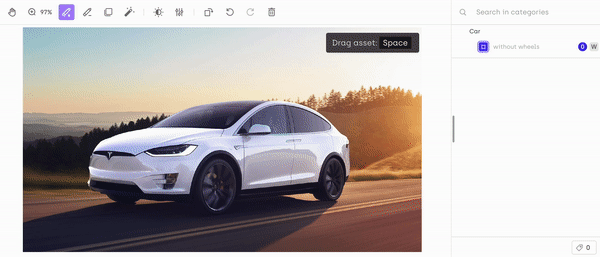
In our example, our category is: “Car without wheels”. We want to select the car and remove its wheels.
First, from the top menu, select the interactive segmentation tool, next, select the car. Finally, press and hold Alt/Option and then click in the center of the region that you want to remove from the mask:
When using the Interactive Segmentation click tool (the magic wand icon), you can press the Enter key to validate the segmentation mask you’re working on and immediately start creating another one, without having to re-select the class and the tool with additional clicks. This speeds up the process of creating multiple annotations on the same image.
An alternative (and faster) way of adding annotations through interactive semantic segmentation is to use the Bounding box tool. When you use a bbox, you can more accurately target the object that you want to annotate.
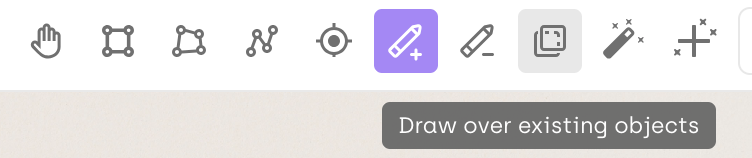
Draw over existing objects
The "Draw over existing object" toggle allows you to choose whether the object you are drawing will overlap with existing ones or not.
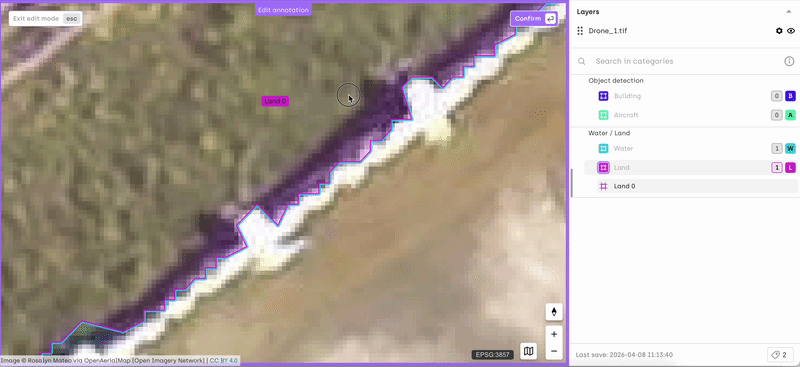
Editing Masks with the Node Editor
You can refine semantic segmentation masks using the node editor, which allows precise control over mask geometry.
How to use the node editor
- Enter edit mode or double-click on a mask to display its nodes
- Drag nodes to reshape the mask
- Click a node to delete it
- Hover over a segment to add an intermediate node
Additional actions
- Press the
Delkey to delete a mask while the node editor is active
For performance reasons, the number of visible nodes depends on the zoom level. If some nodes are not visible, zoom in to display all nodes for the visible segment of the mask (node density adapts to zoom level)
Updated 4 months ago