
Adding assets to project
You can add assets as part of the project creation process or later on in your project lifetime.
You can add assets from these sources:
- For information on how to add assets located on your local servers, refer to Adding assets located on premise.* Kili does not allow for hybrid storage with assets hosted in Kili's cloud storage and remote Cloud storage. To prevent unexpected app behavior, when you use remote Cloud storage in your project, other options to upload data are disabled.
You can also add assets programmatically.
For information on adding assets through Kili SDK , refer to our example recipe:
Or follow examples in our Python SDK Github repo.
For information on how to add assets through the Kili CLI, refer to CLI reference.
- The maximum number of assets in a project is 25,000.* For video projects, to have a smooth interface, work on videos with less than 1,000 frames
The range of available methods to add assets to your Kili project depends on your Kili deployment type.
Refer to a detailed list of asset formats supported by Kili.
Adding rich text assets
Importing rich text is currently supported through:
- the Kili API. Refer to an example tutorial.
- the Cloud storage.
Adding video assets
You can choose between two annotation modes when importing a video:
- Annotate as a video – Uses the original frame rate of the video to ensure full consistency with the source.
- Annotate as individual images – Allows you to set a custom frame rate that best fits your labeling needs.
Videos with non-integer frame rates don't require any additional preparation steps. They can be uploaded to Kili directly.
You can convert your video before importing it, by using this ffmpeg command:
ffmpeg -i <input.mp4> -vcodec libx264 -acodec aac <output.mp4>Labeling videos that have been cut up into individual frames can be noticeably slower and narrows down the available feature set. Some video formats can only be uploaded as individual frames. For more information, refer to Supported video formats.
For more information, refer to Labeling video assets.
Multi-layer assets (Image & Geospatial projects)
Kili supports multi-layer assets by allowing you to upload multiple images as layers within a single asset.
This is available in both:
- Image projects
- Geospatial projects
This approach is particularly useful when each layer is part of the data to annotate, such as:
- Change detection (e.g., before / after imagery)
- Multi-temporal analysis
- Multi-sensor data
- Band combinations or custom composites
In this case, each uploaded image is treated as a core component of the asset, and annotators can switch between layers during labeling.
👉 See the SDK tutorial for a step-by-step example of importing multiple images as layers in a Geospatial project.
Note
In Geospatial projects, you can also add contextual layers (e.g., base maps, WMS/WMTS) from the Layers menu. These layers are for visualization only and are not part of the asset data.
Adding assets from your local workstation
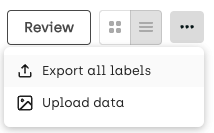
- If you're adding assets to an existing project, from your project queue, click the
Morebutton, and selectUpload data. - Select
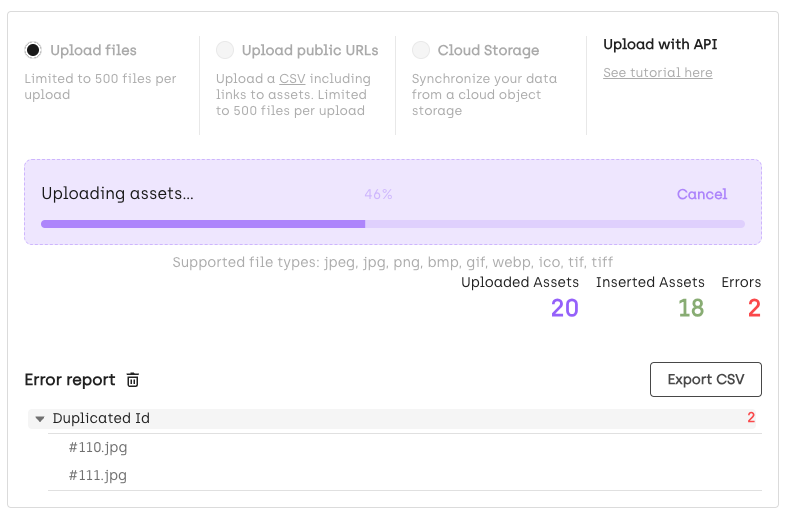
Upload files. - Drag & drop your asset files. Use one asset per file, max 500 files per batch.
Your data will be securely stored in a dedicated bucket on our cloud. Only you have access to it.
Adding remote assets using links (URLs)
Go to your project and then:
- If you're adding assets to an existing project, from your project queue, click the
Morebutton, and selectUpload data. - Select
Upload URLs. - Drag & drop the CSV file with URLs of the assets. Refer to Required CSV file format.
Your data remains hosted at its origin. No data is stored on Kili servers.
Required CSV file format
Create a CSV file with two columns: externald and url. Use one asset per line. Refer to this example:
externalId,url
image_1,https://images.pexels.com/photos/45209/purple-grapes-vineyard-napa-valley-napa-vineyard-45209.jpeg
Adding assets from cloud storage (integrations)
- You must first create an integration. For details, refer to Creating a cloud storage integration.* Some file formats are not supported with cloud integrations. For details, refer to the list of supported file formats.
To add assets located in cloud storage through an integration:
- If you're adding assets to an existing project, from your project queue, click the
Morebutton, and selectUpload data. - Select
Cloud storage. - Click New.
- From the Select cloud storage list, select your existing integration.
- Click Save.
- If changes between your storage and the project are detected, a button will be displayed so you can complete the upload of assets. Otherwise "no updates" is displayed on the data connector. To synchronize assets with your project, click Update.
Creating a cloud storage integration
- Only organization admins can manage cloud integrations.
- Kili supports integrations with AWS S3, Azure Blob Storage, and Google Cloud Platform.
- An integration can be shared by multiple projects.
Follow the steps listed in either of:
- Creating an Azure Blob Storage integration
- Creating an AWS S3 integration
- Creating a GCP Cloud Storage intergation
Adding assets located on premise
When you import video assets, Kili runs some backend checks on the files (for example, to determine the frame rate). In on-prem configurations where the Kili app and video files are hosted in different places and Kili backend has no access to these files the video upload fails.
The data will be streamed through the web browser and only available within your internal network.
If you are planning to use data located on your hard disk, for security reasons, you must use HTTPS with certificates certified by an authority. This means that you need a DNS which points to your files served locally. Follow this process:
- Set up your DNS.
- Generate a certificate.
- Create your server.
- Create a CSV file containing the URLs to the data you want to serve. Refer to Required CSV file format.
- Use the CSV file to add assets to your project. Refer to Adding assets from the Web.
- If the local server is down, you will lose access to your data while using Kili Technology.* To provide external users access to the data and to set up localhost as your file server, it's necessary to display your localhost on the Internet. Follow this tutorial: Exposing localhost server to the Internet.* For security reasons, we avoid mixed content and enforce assets to be served over HTTPS (not HTTP). So all asset URLs must begin with
<https://>.
Setting up your DNS
Setting up your DNS depends on the service that you use. For example, if you use Wordpress, from the <https://wordpress.com/domains/manage> page, create a domain name that points to your file server. The example domain that we will be using is: test-ssl.kili-technology.com.
Generating a certificate
Follow this procedure to generate a certificate that is signed by an authority:
- Run the following command:
certbot -d test-ssl.kili-technology.com --manual --logs-dir certbot --config-dir certbot --work-dir certbot --preferred-challenges dns certonlyIf
certbotis missing, you can add it using your system's package manager.
- When prompted, add an email address.
A message appears, listing the value that you must add to the subdomain:
Please deploy a DNS TXT record under the name:
_acme-challenge.test-ssl.kili-technology.com
with the following value:
<example-value>-
Log into your DNS provider and add the
<example-value>to the provided subdomain. In our example, we're using_acme-challenge.test-ssl.kili-technology.com. -
Press Enter. Two files are created:
fullchain.pemandprivkey.pem.
Creating your server
Create a local server and add your files to it.
Here is an example of how to create a local server using python:
import ssl, os
from http.server import HTTPServer, SimpleHTTPRequestHandler
class Handler(SimpleHTTPRequestHandler):
    def send_response(self, *args, **kwargs):
        SimpleHTTPRequestHandler.send_response(self, *args, **kwargs)
        self.send_header('Access-Control-Allow-Origin', '*')
port = 443
httpd = HTTPServer(('0.0.0.0', port), Handler)
httpd.socket = ssl.wrap_socket(httpd.socket, keyfile='privkey.pem', certfile='fullchain.pem', server_side=True)
print("Server running")
httpd.serve_forever()
Save this code as server.py and place it in the same folder as fullchain.pem and privkey.pem. Then, run your server using the sudo python server.py command.
Learn more
For end-to-end examples of how to programmatically add assets, asset metadata, and asset pre-annotations to a project using Kili's Python SDK, refer to these tutorials:
We've also created a separate tutorial on adding video assets to Kili.
If you're planning to add TIFF files, refer to a detailed list of TIFF raster drivers supported by Kili.
Updated 3 months ago