Getting started with Kili
This topic will guide you through a typical Kili project lifecycle. You will learn how to:
- Set up a project
- Add assets to your project
- Build project ontology using tools made available by Kili
- Add users to project and assign their roles in the project
- Properly configure quality management metrics
- Review labeled assets
- Analyze project KPIs
- Export annotations
Setting up a project
A project is a space where the work on data is done. This is where you configure the labeling jobs, import assets, supervise the production of labels and export the completed work.
Projects are created inside an organization. Only invited users can contribute.
Regarding your workflow and operational constraints, you can adopt two different approaches to labeling in Kili:
- One-off project: Upload data > label > export labels.
- Continuous work: When your initial labeling is done, you still regularly add new assets to label and improve your model.
You can either create a project from the Kili graphical user interface or create a project programmatically using the Kili Python SDK.
For information on how to create a project from Kili CLI, refer to our Command Line Interface documentation
Next step: Adding assets to your project.
Adding assets to project
In Kili, an asset can be a file or a document. This could be a photograph, a satellite image, a video, a PDF, an email, etc. For a full list, refer to Supported file formats.
You can add assets located on:
- For information on how to add assets located on your local servers, refer to Adding assets located on premise.* Kili does not allow for hybrid storage with assets hosted in Kili's cloud storage and remote Cloud storage. To prevent unexpected app behavior, when you use remote Cloud storage in your project, other options to upload data are disabled.
You can also add assets programmatically. For information on adding assets through Kili's Python SDK , follow this tutorial.
For information on how to add assets through the Kili CLI, refer to our Command Line Interface documentation.
The maximum number of assets in a project is 25,000.
If you need to add asset metadata, refer to Adding asset metadata.
For additional information, refer to Asset lifecycle in Kili app.
Next step: Building project ontology.
Building project ontology
In Kili, labeling (or annotation) jobs are labeling tasks which are associated with specific tools.
For example, each one of these can be considered a Kili labeling job:
- Classification task with a multi choice dropdown
- Object detection task with polygon tool
- Named entities recognition task
Kili jobs may contain nested subjobs, for example:
- Classification tasks with nested conditional questions
- Object detection tasks with nested transcription containing additional details
Some jobs types may be interdependent. For example, available relations in a named entities relation job will depend on how classes were defined in a named entities recognition job.
Additionally, each job can be either required or optional.
Creating projects with lots of labeling jobs is not efficient. Project complexity and potential performance issues mean that it is harder for members to complete all the jobs. Such a project is also harder to review.
It is better and more efficient to split your jobs in multiple projects, and then to concatenate your labels later, even if this operation must be done outside Kili.
Kili provides the following machine learning job types:
Availability of specific job types depends on your project asset type:
Available labeling job types per asset type
| Labeling job type | Image | Text | Video | |
|---|---|---|---|---|
| Classification | ✓ | ✓ | ✓ | ✓ |
| Object detection | ✓ | ✓ | ✓ | |
| Object relation | ✓ | ✓ | ✓ | |
| Named entities recognition | ✓ | ✓ | ||
| Named entities relation | ✓ | ✓ | ||
| Transcription | ✓ | ✓ | ✓ | ✓ |
You can customize your interface through the UI-based interface builder or through JSON settings.
If you need to add project metadata, refer to Adding project metadata.
Next step: Adding project members and assigning roles
Adding users to project and assigning their roles in the project
Users, often called Members in the Kili app, are managed at two levels:
- Organization they belong to
- Projects they work for
On Kili Technology platform, a user (identified by email) can only belong to a single organization.
Inside an organization, users can be part of multiple projects, with equal or different roles.
Organization admins are admins of all the projects within an organization.
For additional information, refer to:
Depending on user role, users will have access to different features. Refer to the following:
Maximum number of members per project is limited to 50. If you need more, contact us at [email protected].
For hands-on examples on how to programmatically add project members using Kili's Python SDK, refer to this tutorial.
Next step: Configuring quality management.
Configuring quality management metrics
Kili's built-in automatic workload distribution mechanism facilitates load management, allows for faster project annotation, and prevents duplicating work.
For example, if several users collaborate on an annotation project, Kili app distributes the data to be annotated to each project member so that each annotator processes unique data. The same data will not be annotated twice, unless Consensus is activated.
To help labelers and reviewers meet the labeling requirements for the project, you can set labeling instructions. Your instructions can also serve as reference, if questions arise.
Labelers who are unsure about a specific label can ask a question. Reviewers, team managers and project admin will be notified and will have the option to answer and close the question.
The number of open questions is shown on the issue button.

For information on how to handle questions asked by labelers, refer to Handling questions and issues.
To further increase your label quality, use the following tools:
For hands-on examples on how to programmatically configure QA workflows in Kili using the Kili's Python SDK, refer to this tutorial.
Next step: Reviewing labeled assets.
Reviewing labeled assets
You can review assets in two ways:
- You manually select the annotated assets.
- Assets are randomly selected for review from the review queue.
In both cases, the review interface is similar to the labeling interface and allows you to review labeled assets and then:
- make corrections, if necessary
- send assets back to the queue
To be able to quickly find any asset, you can use Kili's advanced filtering features.
To provide feedback to labelers, reviewers can add issues.
The number of open issues is shown on the issue button and is also available from the Analytics page.
For information on how to find, add, and resolve issues, refer to Handling questions and issues.
Next step: Analyzing project KPIs.
Analyzing project KPIs
The Analytics page provides an overview of the project progress.
By using the tabs on the left side of the screen, you can select whether you want to access:
Overview
Overview contains a snapshot of the project. You can trace what's already been done and access a quick summary of open questions and skipped assets.
Use the visual progress bar to quickly check how many assets have been annotated, reviewed, or still left to do and then click on a specific category to immediately jump to the correctly filtered Explore view.
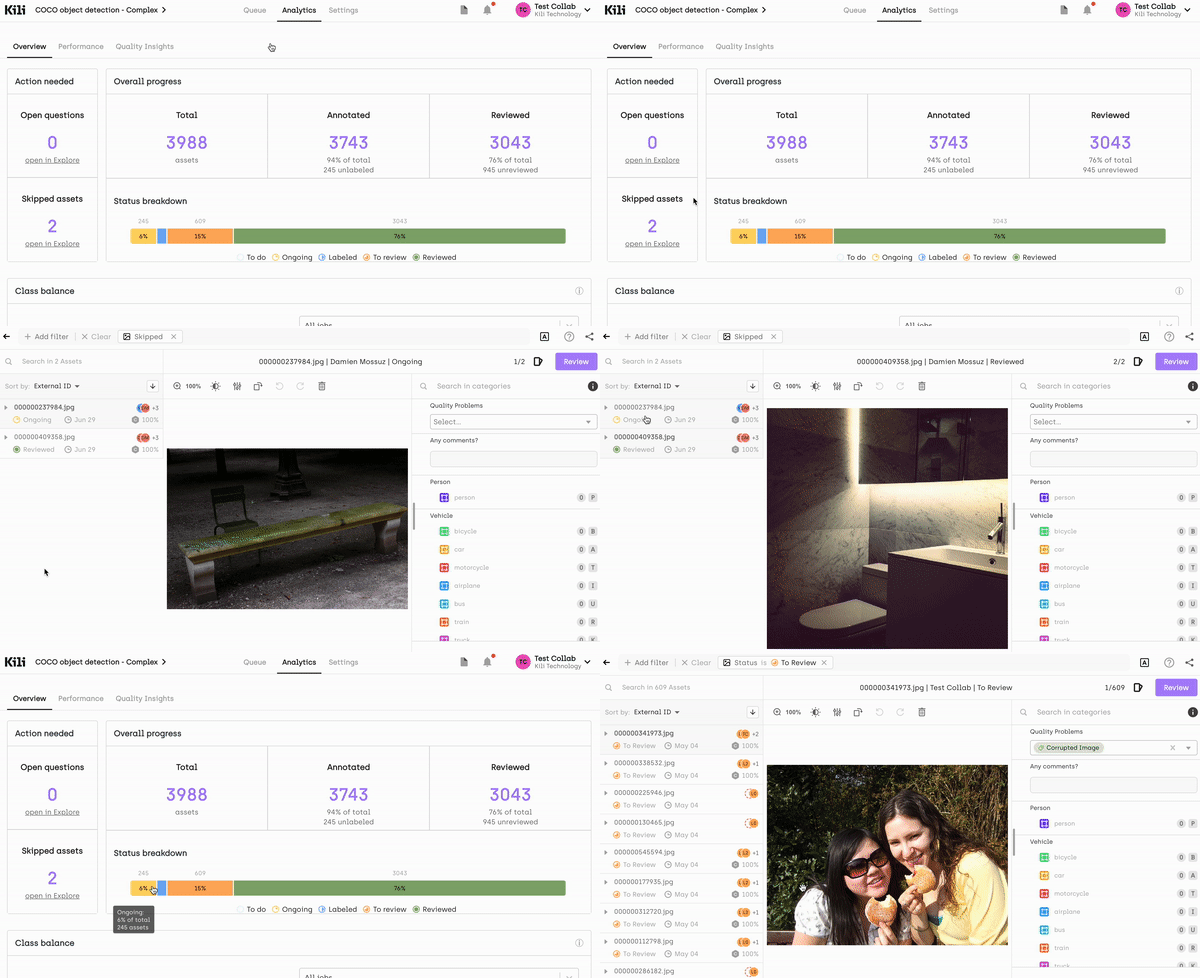
Additionally, you have access to an overall class balance, that is information on what percentage of the total number of annotations are labels given to a specific class. For extra granularity, you can select either the whole project or drill down to specific labeling jobs.

Performance
From the Performance tab, you can check how many assets are being labeled and reviewed in a daily, weekly and monthly time frames. Note that we're taking into account actions, not just assets. So if two or more project members labeled (for example as part of consensus) or reviewed the same asset, the number will be higher.
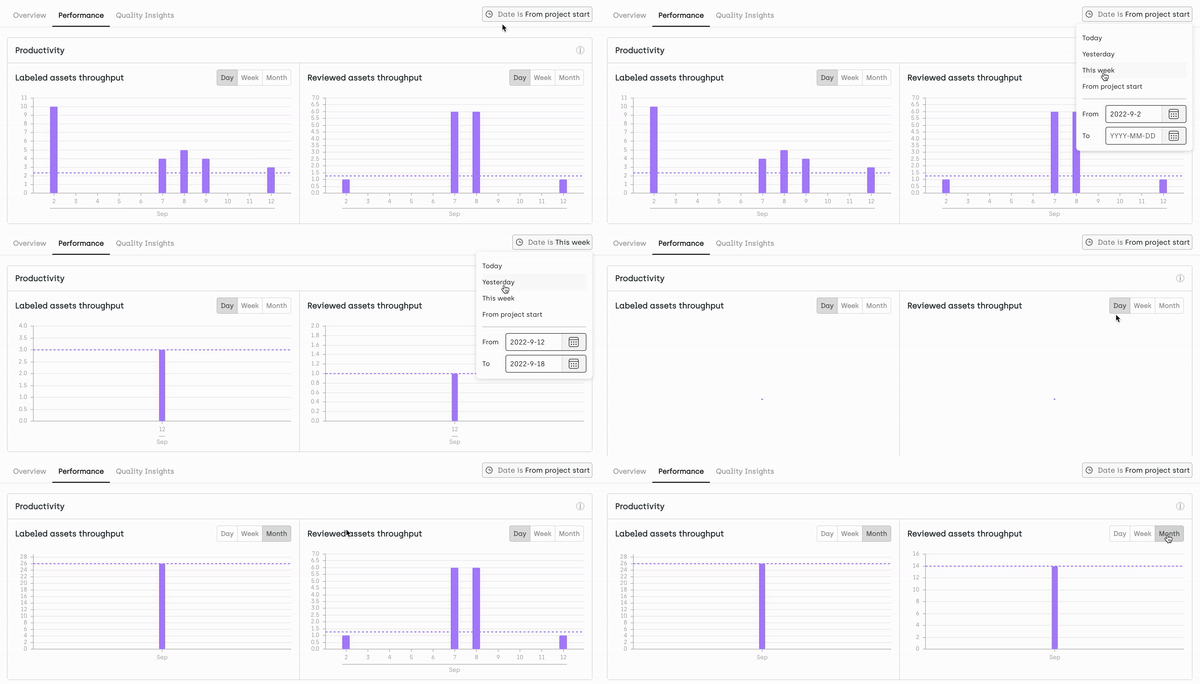
From here, you can also access detailed labeling statistics that you can later export as a .csv file and process outside Kili.

Through performance metrics you can assess the velocity of your team after the project has been running for some time. How is it evolving per asset? Are some of the assets outliers? If so, why? Is the performance consistent with what you were expecting? How does it affect your project timeline? Once you have all this information, you can then deep dive and analyze available data per annotator to see if you can spot any discrepancies and items to focus on.
Quality Insights
From the Quality Insights tab, you have access to insights regarding consensus and honeypot metrics (if you set them up in your project). Information is presented per class (with an option to delve deeper, per job) and per labeler. You also have access to an overall total agreement score for consensus and honeypot. For information on how these are calculated, refer to Calculation rules for quality metrics.
When done, you can click directly on the graph to switch to the Explore view and start your review.
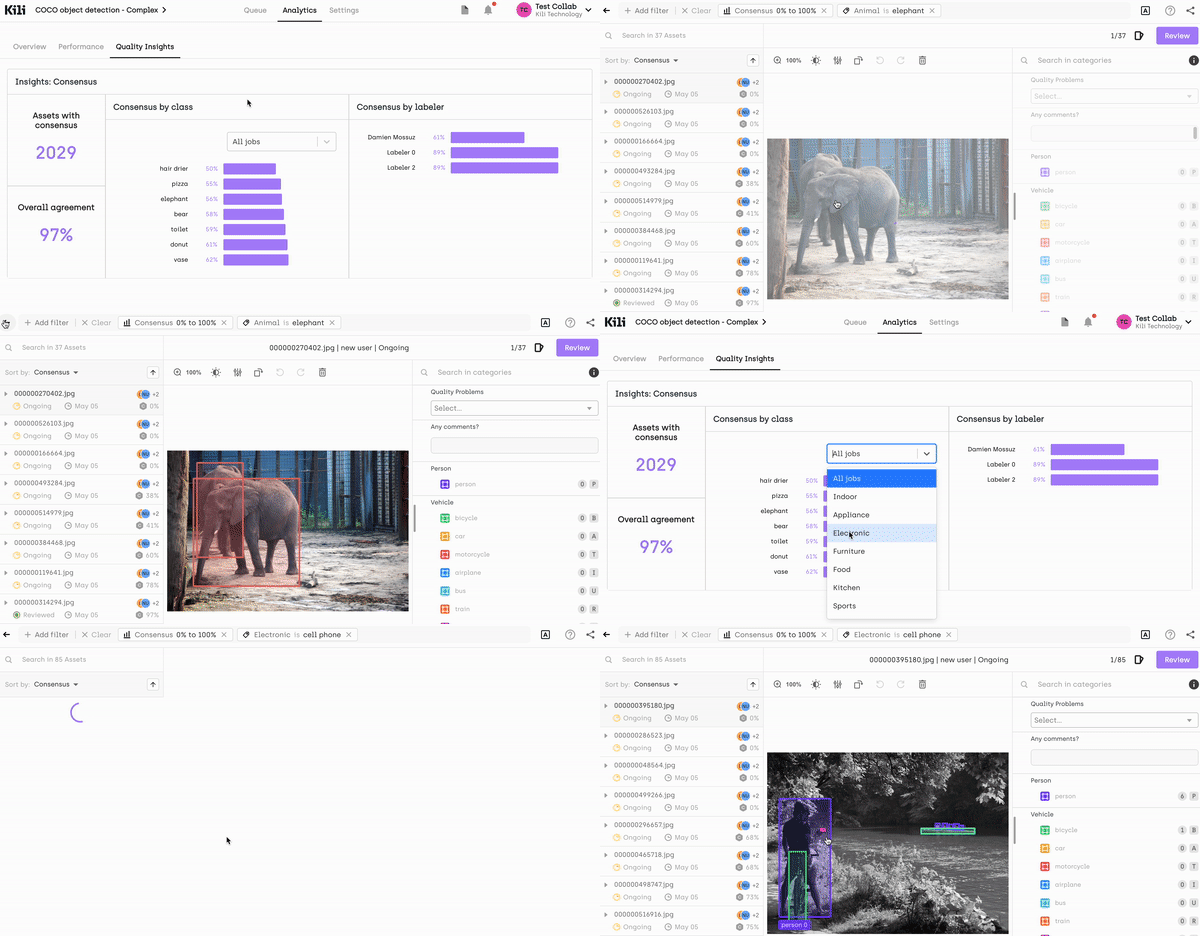
Use the graphs and scores to target the most relevant assets to focus your review on. For example, if you spot a class with the lowest consensus mark, you can then check on it by using the Explore view to properly research and address this issue.
If neither Consensus nor Honeypot are set in your project, the Quality Insights tab shows the review score per labeler. The review score calculations for each asset are made by comparing the original label (either added by a human or by a model) with its reviewed version. This metric provides additional insight into how well the team is performing. Additionally, the tab contains information on how the review score evolved over time. For information on how Kili app calculates the review score, refer to Calculation rules for quality metrics.
Next step: Exporting annotations
Exporting annotations
- From the project Queue page, select the assets that you want to export. Quick actions menu appears above the asset list.
- From the Quick actions menu, select
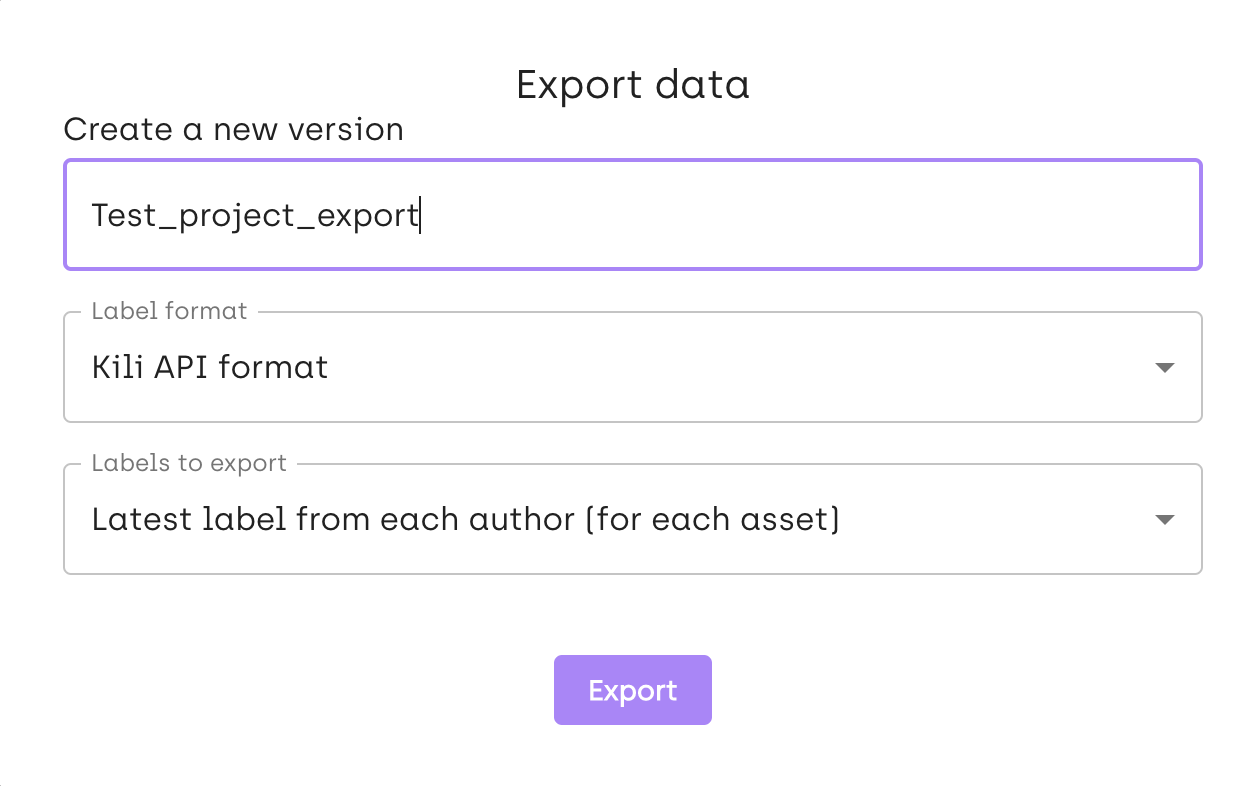
Export. - From the "Export data" popup window, select your export parameters and then click Export.
- Wait for the notification to appear in the top-right corner of the screen.
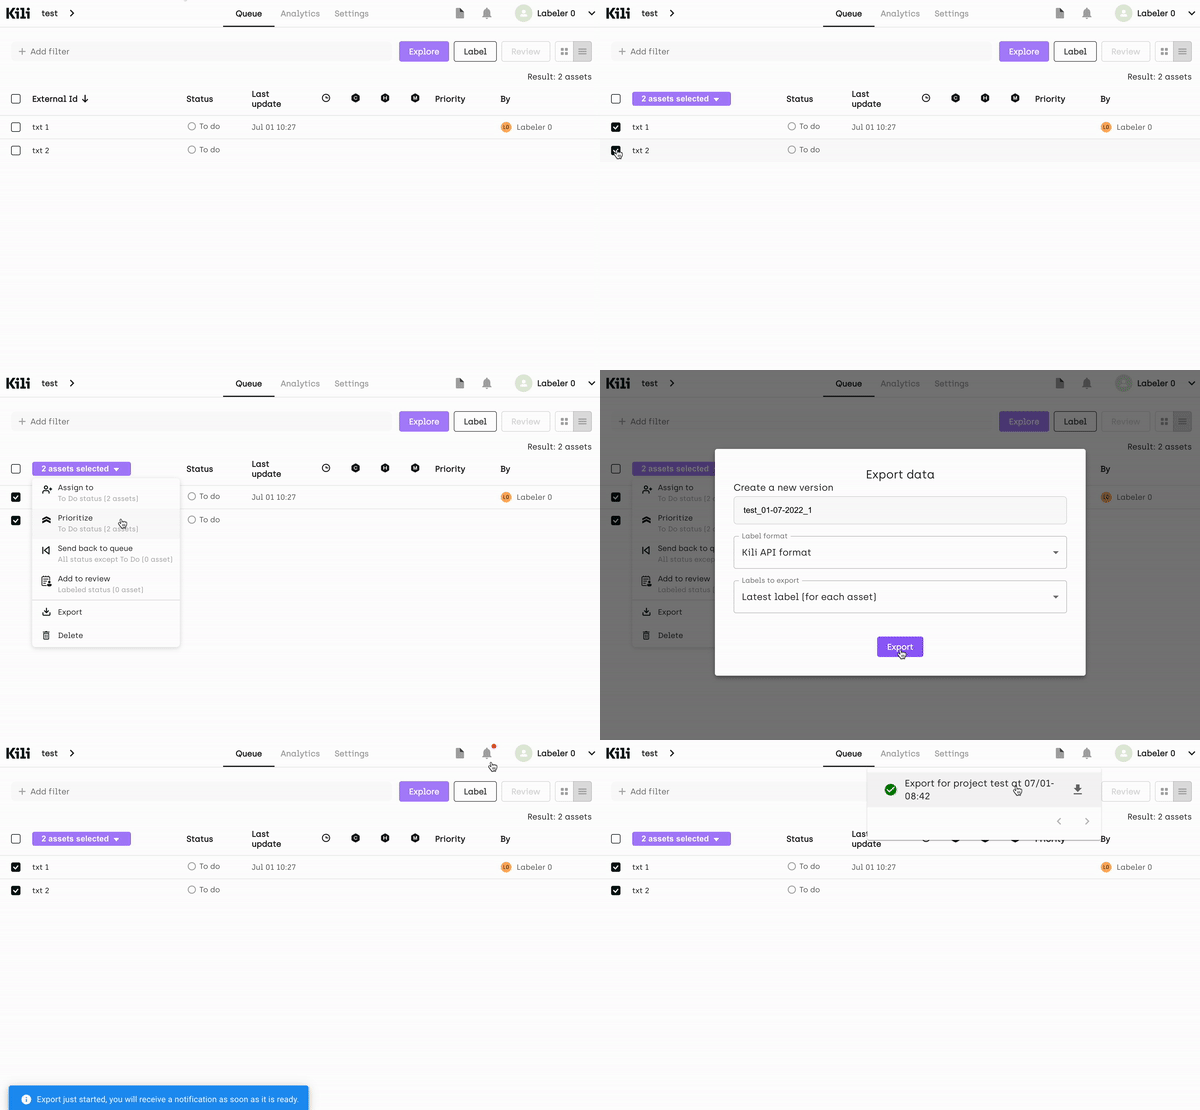
Customizing export parameters
From the "Export data" popup window, you can customize these export parameters:
- Label format
- Scope of exported labels
- (YOLO formats only) Splitting labels per labeling jobs
For more information refer to Kili data format.
For hands-on, examples on how to programmatically export data from Kili using Kili's Python SDK, refer to this tutorial.
Learn more
For an end-to-end example of how to set up a Kili project programmatically using Kili's Python SDK, refer to our Basic project setup tutorial.
Updated 3 months ago